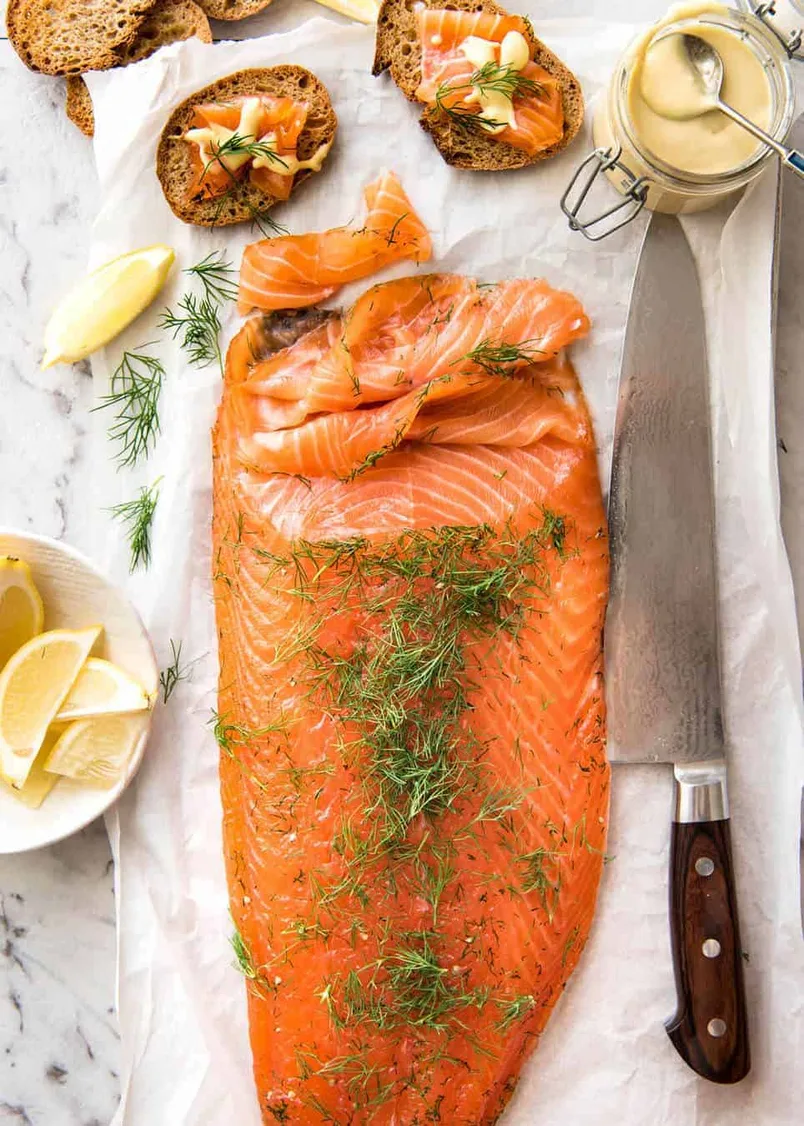
Danish Gravlax
https://www.recipetineats.com/cured-salmon-gravlax/
INGREDIENTS
- 1 tbsp white peppercorns (whole) (Note 1)
- 1 cup fresh dill, roughly chopped (1 big bunch)
- 250g / 8 oz rock salt (Note 2)
- 250g / 8 oz white sugar (Note 3)
- 1 kg / 2 lb salmon, sashimi-grade, bones removed and skin on (Note 4)
Mustard Cream Sauce
- ½ cup / 125 ml heavy / thickened cream
- ⅓ cup Dijon Mustard (or hot mustard if you want a kick)
- 2 tsp Mustard Powder
- Salt and pepper
To Serve
- Rye bread slices or other bread/crackers (Note 5)
- Lemon wedges
- ¼ cup fresh dill, roughly chopped (for garnish)
DIRECTIONS
-
Crush peppercorns with the side of a knife (or roughly grind using mortar and pestle).
-
Combine peppercorns with salt, sugar and dill.
-
Place 2 large pieces of cling wrap on a work surface, slightly overlapping. Spread half the salt mixture in the shape of the salmon.
-
Place salmon on salt, skin side down. Top with remaining salt mixture.
-
Wrap with cling wrap. Place in a large dish. Top with something flat (like small cutting board) then 3 x 400g / 14oz cans ("Weights").
-
Refrigerate for 12 hours. There will be liquid in the dish. Turn salmon over (will be gloopy/wet)), then replace Weights and return to fridge. After another 12 hours, turn salmon over again, replace Weights. After another 12 hours, remove salmon from fridge. 36 hours total for Medium Cure - Perfect Gravlax to my taste (See Note 2 for description and more curing times).
-
Unwrap salmon, scrape off salt then rinse. Pat dry. If time permits, return to the fridge for 3 - 12 hours uncovered (dries surface better, lets salt "settle" and permeate through flesh more evenly).
-
Sprinkle over the 1/4 cup extra dill - for garnish and flavour.
-
Slice thinly on an angle, do not cut through skin (i.e. don't eat skin). Serve with toasted bread, Mustard Sauce, extra dill and lemon wedges.
Mustard Sauce
-
Mix ingredients, making sure to season with salt and pepper. It should taste like a creamy mustard - a touch of tartness, but mostly to add moisture to the dish. You can add lemon juice and/or zest if you wish - I like to serve with wedges so people can adjust to their taste.
-
Bring to a boil and let the beets cook for 30 minutes.
-
Pour off the water and when the beets have cooled, rub the skin off. Cut the beets into slices and place them in a completely clean and scalded preserving jar.
-
Put all the ingredients for the marinade in a pot and bring to the boil. It only needs to boil for a few minutes until the sugar has dissolved. Pour the marinade over the beets in the jar. Close the jar immediately.
-
Let the pickled beets steep for a few days. They are then ready to use. Store in a cool, dark place for 2-5 months.
Notes:
- White pepper is slightly spicier than black but has a slightly more milder flavour. The main reason I prefer white over black is so I don't end up with black specks on the salmon = prettier! But black peppercorns or even ground black pepper is fine. If using ground pepper (white or black), use 2 teaspoons.
2. SALT TYPES & CURING TIMES
Salt roughly falls into 4 categories (smallest to largest) - table salt, kosher / coarse cooking salt, flakes and rock salt. Rock salt cures salmon more evenly from the surface to the centre.
DO NOT use table salt (grains too small, makes salmon crazy salty) or iodised salt of any type (can turn salmon brown, packet label should say if it is iodised).
- ROCK SALT: 36 hrs cure time per recipe = Medium Cure. 3 days = Hard Cure
- COARSE SALT / KOSHER SALT:
- 24 hours = Medium Cure,
- 36 hours will be between Medium and Hard Cure,
- 48 hours+ will be Hard Cure.
- Surface will be cured more (ie firmer, drier surface) than using Rock Salt because finer grains penetrate more. Highly recommend resting minimum 12, preferably 24 hours before serving - saltiness will distribute more evenly.
CURING STRENGTH:
- Medium Cure (my preference) = surface is fairly firm and not too salty, inside is lightly cured, still moist (but not raw, it’s cured). Seasoned enough to eat slices plain.
- Hard Cure = surface is quite firm (like a soft jerky) and quite well seasoned, inside is slightly firmer and pretty well seasoned. Contrast between surface and inside more prominent. I find this a touch salty for my taste but is still way less salty than store bought.
-
Sugar, like salt, draws moisture from the flesh and cures it but makes it sweet rather than salty. Using normal sugar rather than superfine / caster sugar ensures that the salmon doesn't get too sweet (i.e. caster sugar penetrates salmon quicker). The right salt and sugar combination is key to controlling the saltiness of Gravlax while still achieving the "cured" effect and without making it too sweet!
-
Please ensure you use SASHIMI-GRADE salmon. I always ask, even if the sign says that! Nowadays in Australian coastal areas, sashimi-grade salmon is quite common at local fish mongers.
-
Skin-on salmon means that the skin side is cured slightly less, however, for me, I prefer skin-on for this exact reason plus it's easier to carve.
SMALLER FILLETS:
The beauty of this recipe is that a little goes a long way! So you don't need to use a whole side of salmon, you can make this with a small fillet. However, if you get one smaller than 500g/1lb, then you'll need to increase the salt/sugar ratio to the weight of the salmon to ensure there's enough to cover the surface area. For a 300g/10oz piece, rather than using 150g/5oz combined salt/sugar, use around 210g/7oz (this is what I measured when I did a test using a smaller piece).
I don't recommend going smaller than 300g/10oz because the width of the salmon will become too narrow and it will probably end up too salty.